Overview
Smart Roof De-icing Controller with Temperature & Moisture Sensor
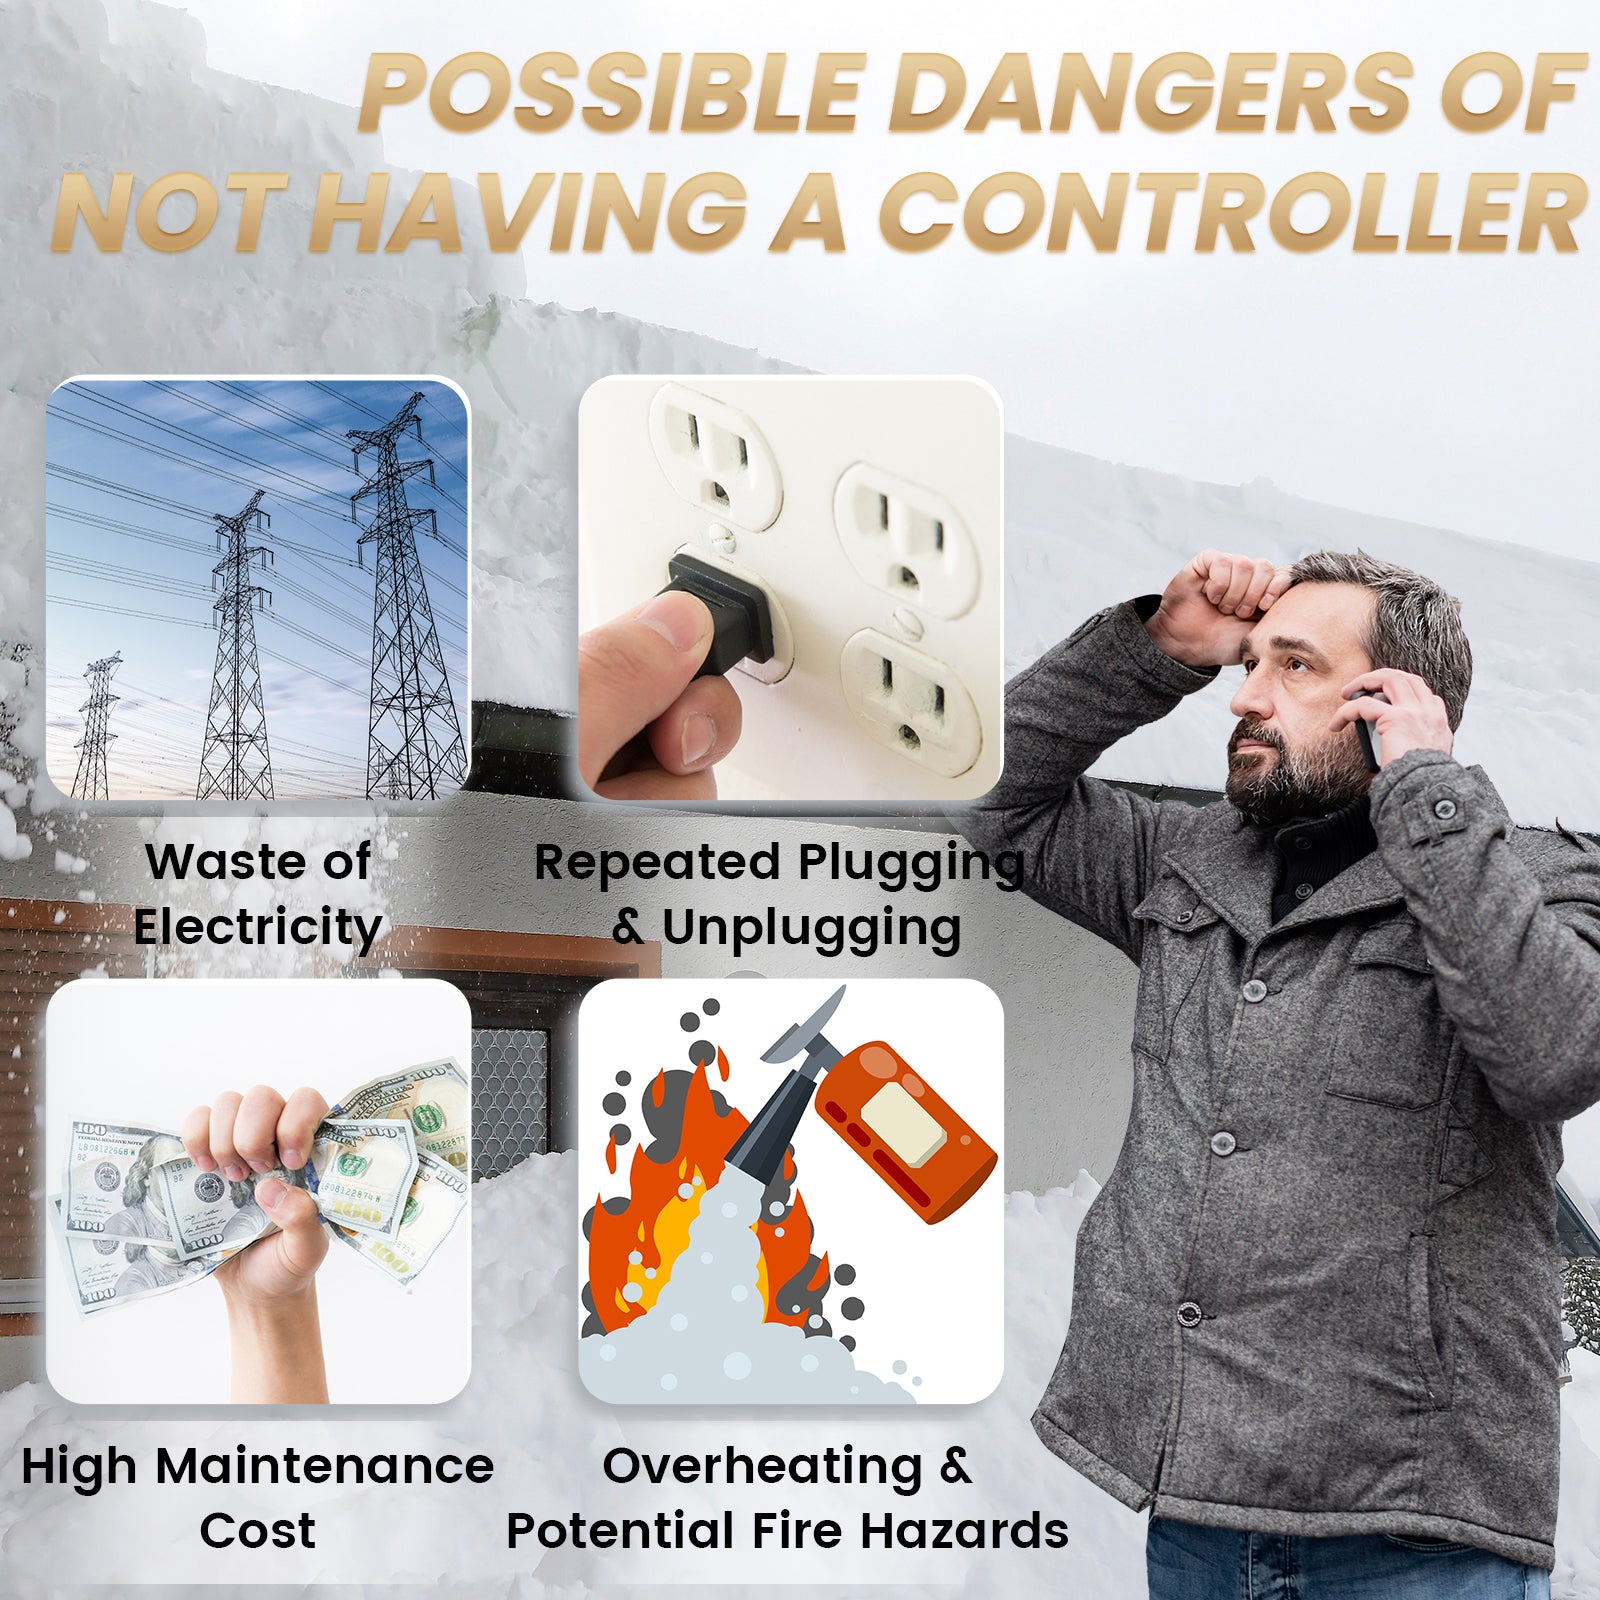
YeloDeer Smart Roof De-icing Controller is designed to control 120V roof and gutter de-icing cables based on winter conditions. It uses both temperature and moisture sensing to help turn roof heating cables on only when ice-forming conditions are present.
This controller is made for roof edges, gutters, downspouts, and ice dam prevention systems. It is especially useful for homeowners who do not want to manually plug and unplug roof heating cables throughout the winter season.
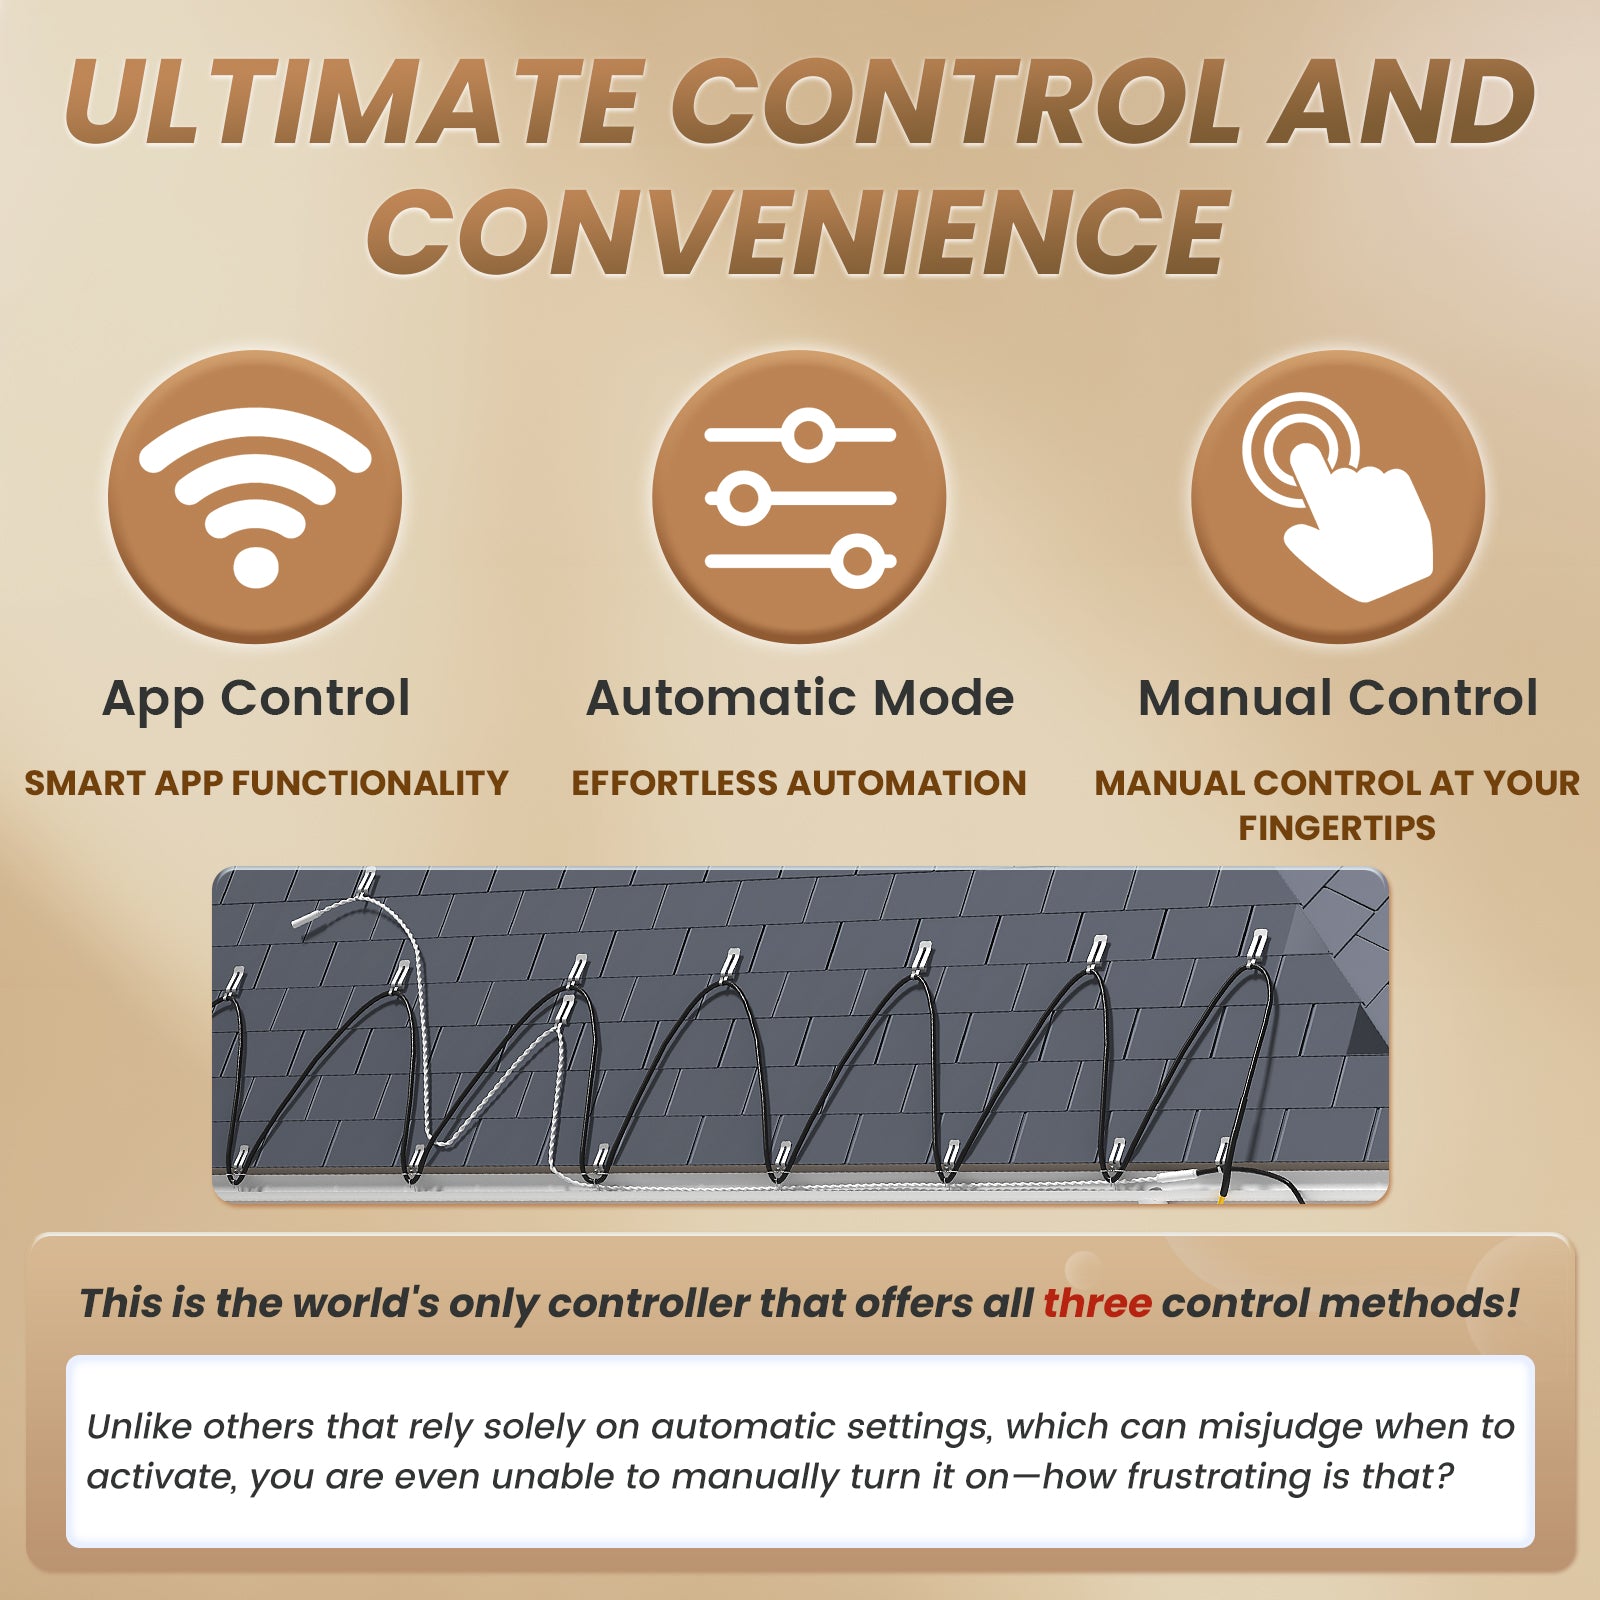
The controller supports automatic operation, manual heating, and app remote control through the Smart Life app, helping make roof de-icing operation more convenient and energy-conscious.
Key Benefits
• Designed for 120V roof and gutter de-icing cables
• Controls roof heating cables based on temperature and moisture
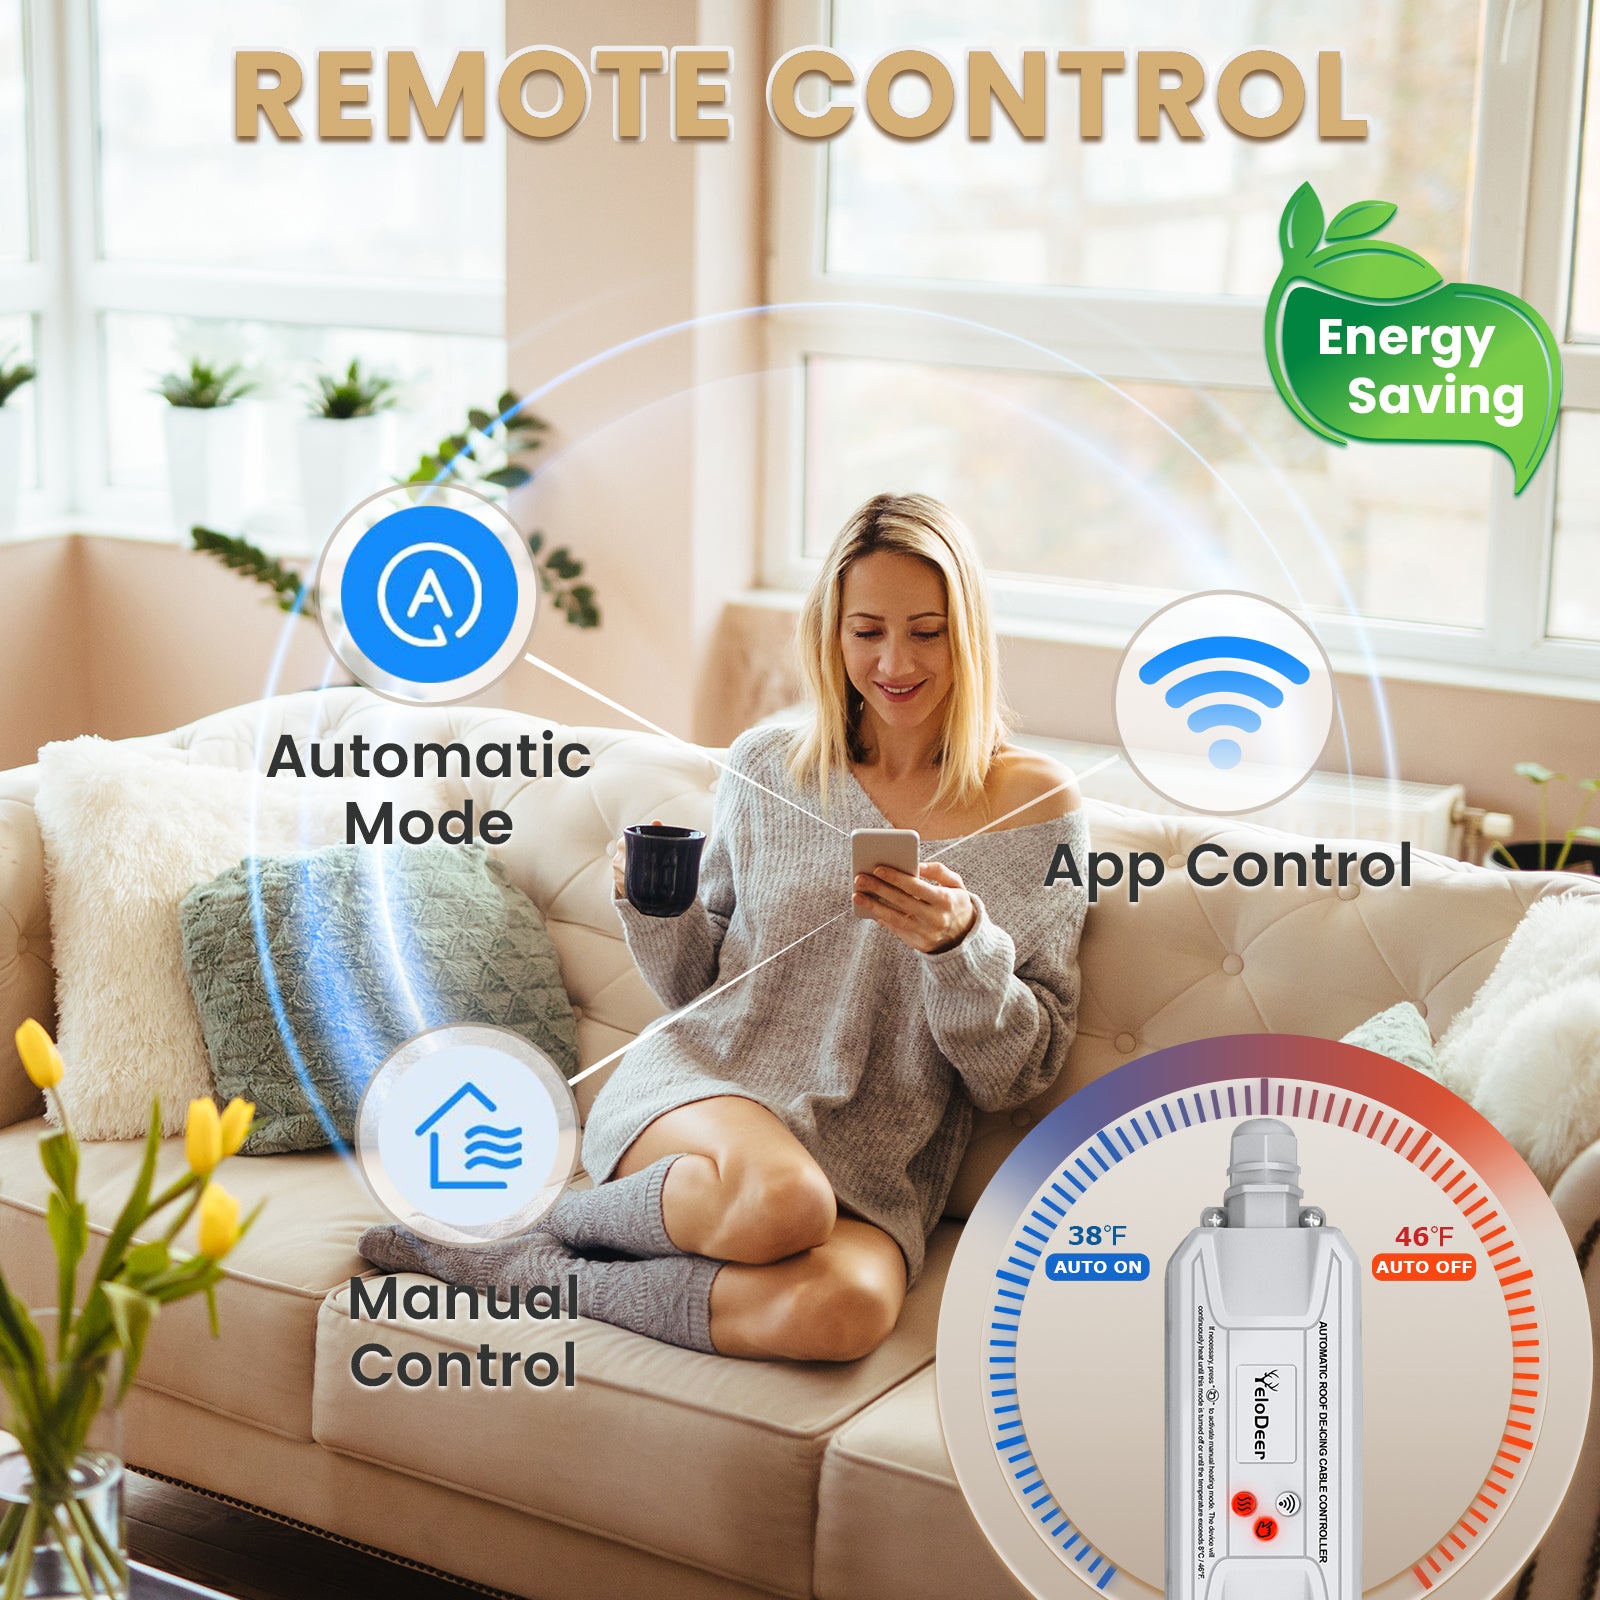
• Auto mode activates around 38°F / 3°C when moisture is detected
• Auto mode turns off around 46°F / 8°C when conditions no longer require heating
• Helps reduce unnecessary roof heating cable runtime
• Supports automatic, manual, and app control modes
• Smart Life app remote control
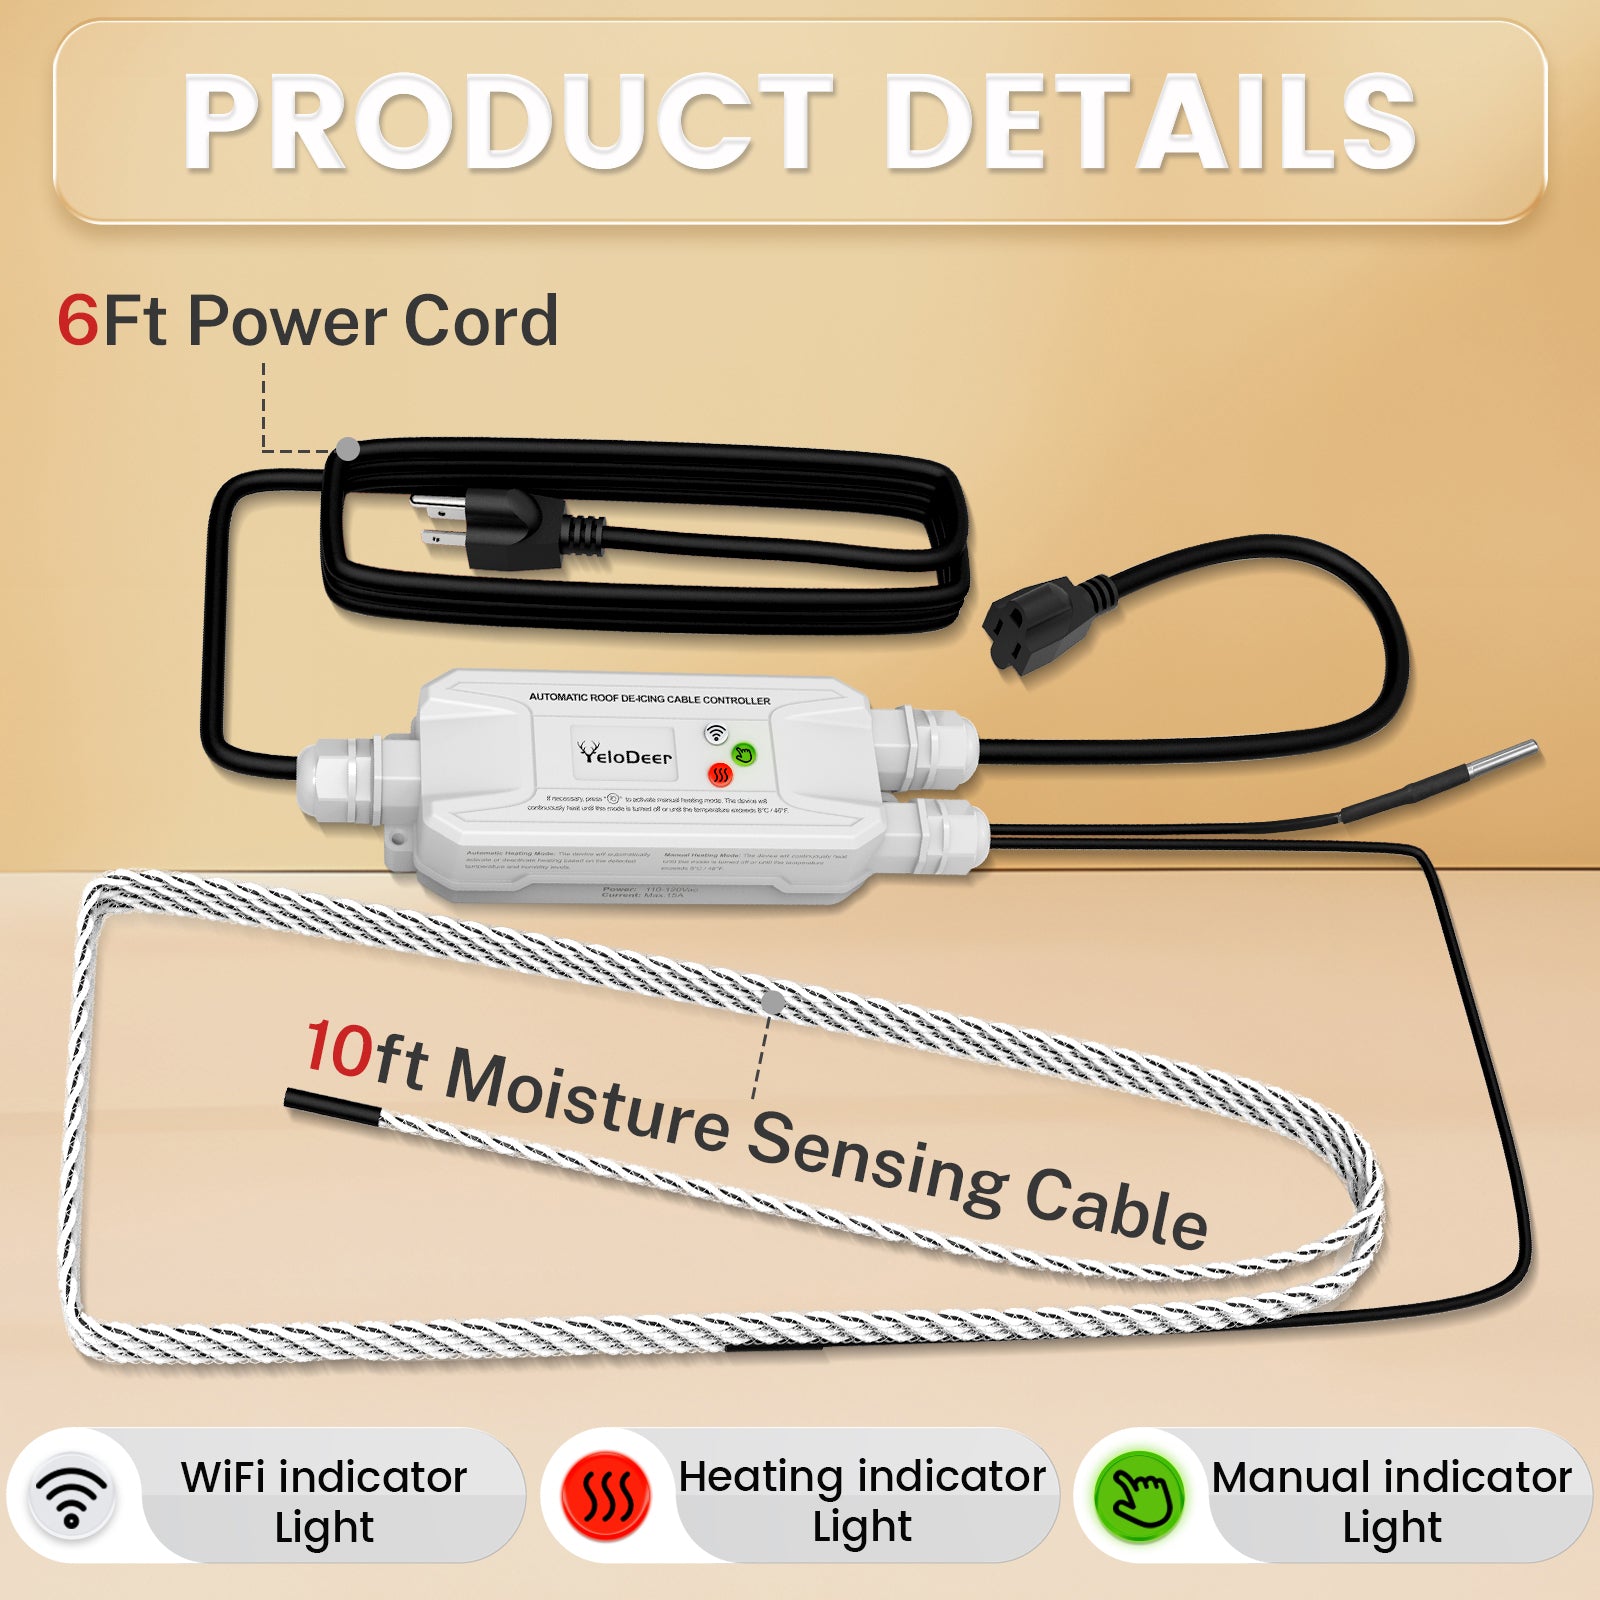
• IP65 weather-resistant controller housing
• 6 ft power cord
• 10 ft moisture-sensing cable
• Power outage memory restores previous settings
• Includes mounting accessories such as shingle clips, spacers, and screws
• Helps manage ice dam prevention for roofs, gutters, and downspouts
Best For
• Roof and gutter de-icing systems
• Ice dam prevention
• Roof edge heating cable control
• Gutter heating cable control
• Downspout freeze protection control
• Homes in cold regions with snow and freeze-thaw cycles
• Customers who want automatic roof heating cable operation
• Customers who want remote control while away from home
Important Before You Order
This product is for roof and gutter de-icing control.
It is not a pipe heat tape thermostat, not an electric floor heating thermostat, and not a general-purpose heating controller.
Before ordering, confirm:
• Your roof de-icing cable is 120V
• Total connected load does not exceed 15A / 1800W
• Your roof heating cable layout allows proper sensor placement
• The moisture-sensing cable can contact meltwater
• The controller can be installed in a suitable outdoor location
• Your outlet and circuit provide required electrical protection
• You understand how automatic mode works
How Auto Mode Works
In automatic mode, the controller does not turn on just because there is snow on the roof.
It turns on when both key conditions are met:
• The temperature is cold enough, around 38°F / 3°C or below
• The moisture sensor detects liquid water from melting snow or ice
This design helps avoid running roof heating cables when the roof is cold but dry, or when snow is present but no meltwater is reaching the sensor.
Why Moisture Sensor Placement Matters
The moisture-sensing cable must be placed where meltwater is likely to contact it.
If the sensor shows “dry,” the controller may not activate in auto mode even if snow is visible on the roof.
Manual mode can be used for testing or temporary operation, but proper sensor placement is important for reliable automatic control.


Applications & Compatibility
Recommended Applications
YeloDeer Smart Roof De-icing Controller is designed for 120V roof and gutter heating cable systems.
Common applications include:
• Roof edge de-icing cable control
• Gutter heating cable control
• Downspout heating cable control
• Ice dam prevention systems
• Sloped roof winter protection
• Metal roof drainage paths
• Asphalt shingle roof de-icing systems
• Roof valleys and problem areas
• Homes with recurring icicles or frozen gutters
• Roof drainage paths affected by freeze-thaw cycles
Compatible Roof Heating Systems
This controller is compatible with many 120V roof and gutter de-icing cables when the total load is within the controller rating.
Before connecting your roof heating cable, confirm:
• Cable voltage is 120V
• Total amperage is within 15A
• Total wattage is within 1800W
• Cable is suitable for roof and gutter de-icing
• Outlet and circuit protection meet local requirements
• Controller and sensor can be installed according to the roof layout
When This Controller Is Most Useful
This controller is most useful when:
• You want roof heating cables to run automatically
• You want to reduce manual plugging and unplugging
• You want to reduce unnecessary energy use
• You are away from home during winter weather
• Your roof has recurring ice dam or gutter freeze issues
• Your heating cables are already installed but need smarter control
When Not to Use This Product
This product is not recommended for:
• Pipe heat tape control
• Electric floor heating
• Baseboard heater control
• In-pipe heating cables
• 240V roof heating systems
• Loads above 15A / 1800W
• Roof layouts where the moisture sensor cannot contact meltwater
• Systems intended to melt heavy snow accumulation quickly
• Installations without proper outdoor electrical protection
For pipe heating control, choose YeloDeer Pipe Heat Tape Thermostat.
Specifications & Sizing
Product Specifications
Product Type: Smart roof and gutter de-icing controller
Application: 120V roof de-icing cable control
Control Modes: Auto mode, manual mode, app control
Auto Activation: Around 38°F / 3°C with moisture detected
Auto Shutoff: Around 46°F / 8°C when heating is no longer required
Voltage: 120V AC
Maximum Load: 15A / 1800W
App Control: Smart Life app
Weather Rating: IP65 controller housing
Power Cord Length: 6 ft
Moisture-Sensing Cable Length: 10 ft
Power Outage Memory: Supported
Included Accessories: Shingle clips, spacers, and mounting screws
Recommended Use: Roof edges, gutters, downspouts, and ice dam prevention systems
Understanding the Three Control Modes
Auto Mode
Auto mode uses temperature and moisture together.
The controller activates when conditions are cold enough and the moisture sensor detects liquid water.
This is the preferred mode for energy-conscious roof de-icing operation.
Manual Mode
Manual mode turns the roof heating cable on directly.
Use manual mode for:
• Testing the heating cable
• Checking controller output
• Temporary operation
• Situations where auto mode does not activate because the sensor is dry
Manual mode should not be used as a permanent replacement for proper sensor placement.
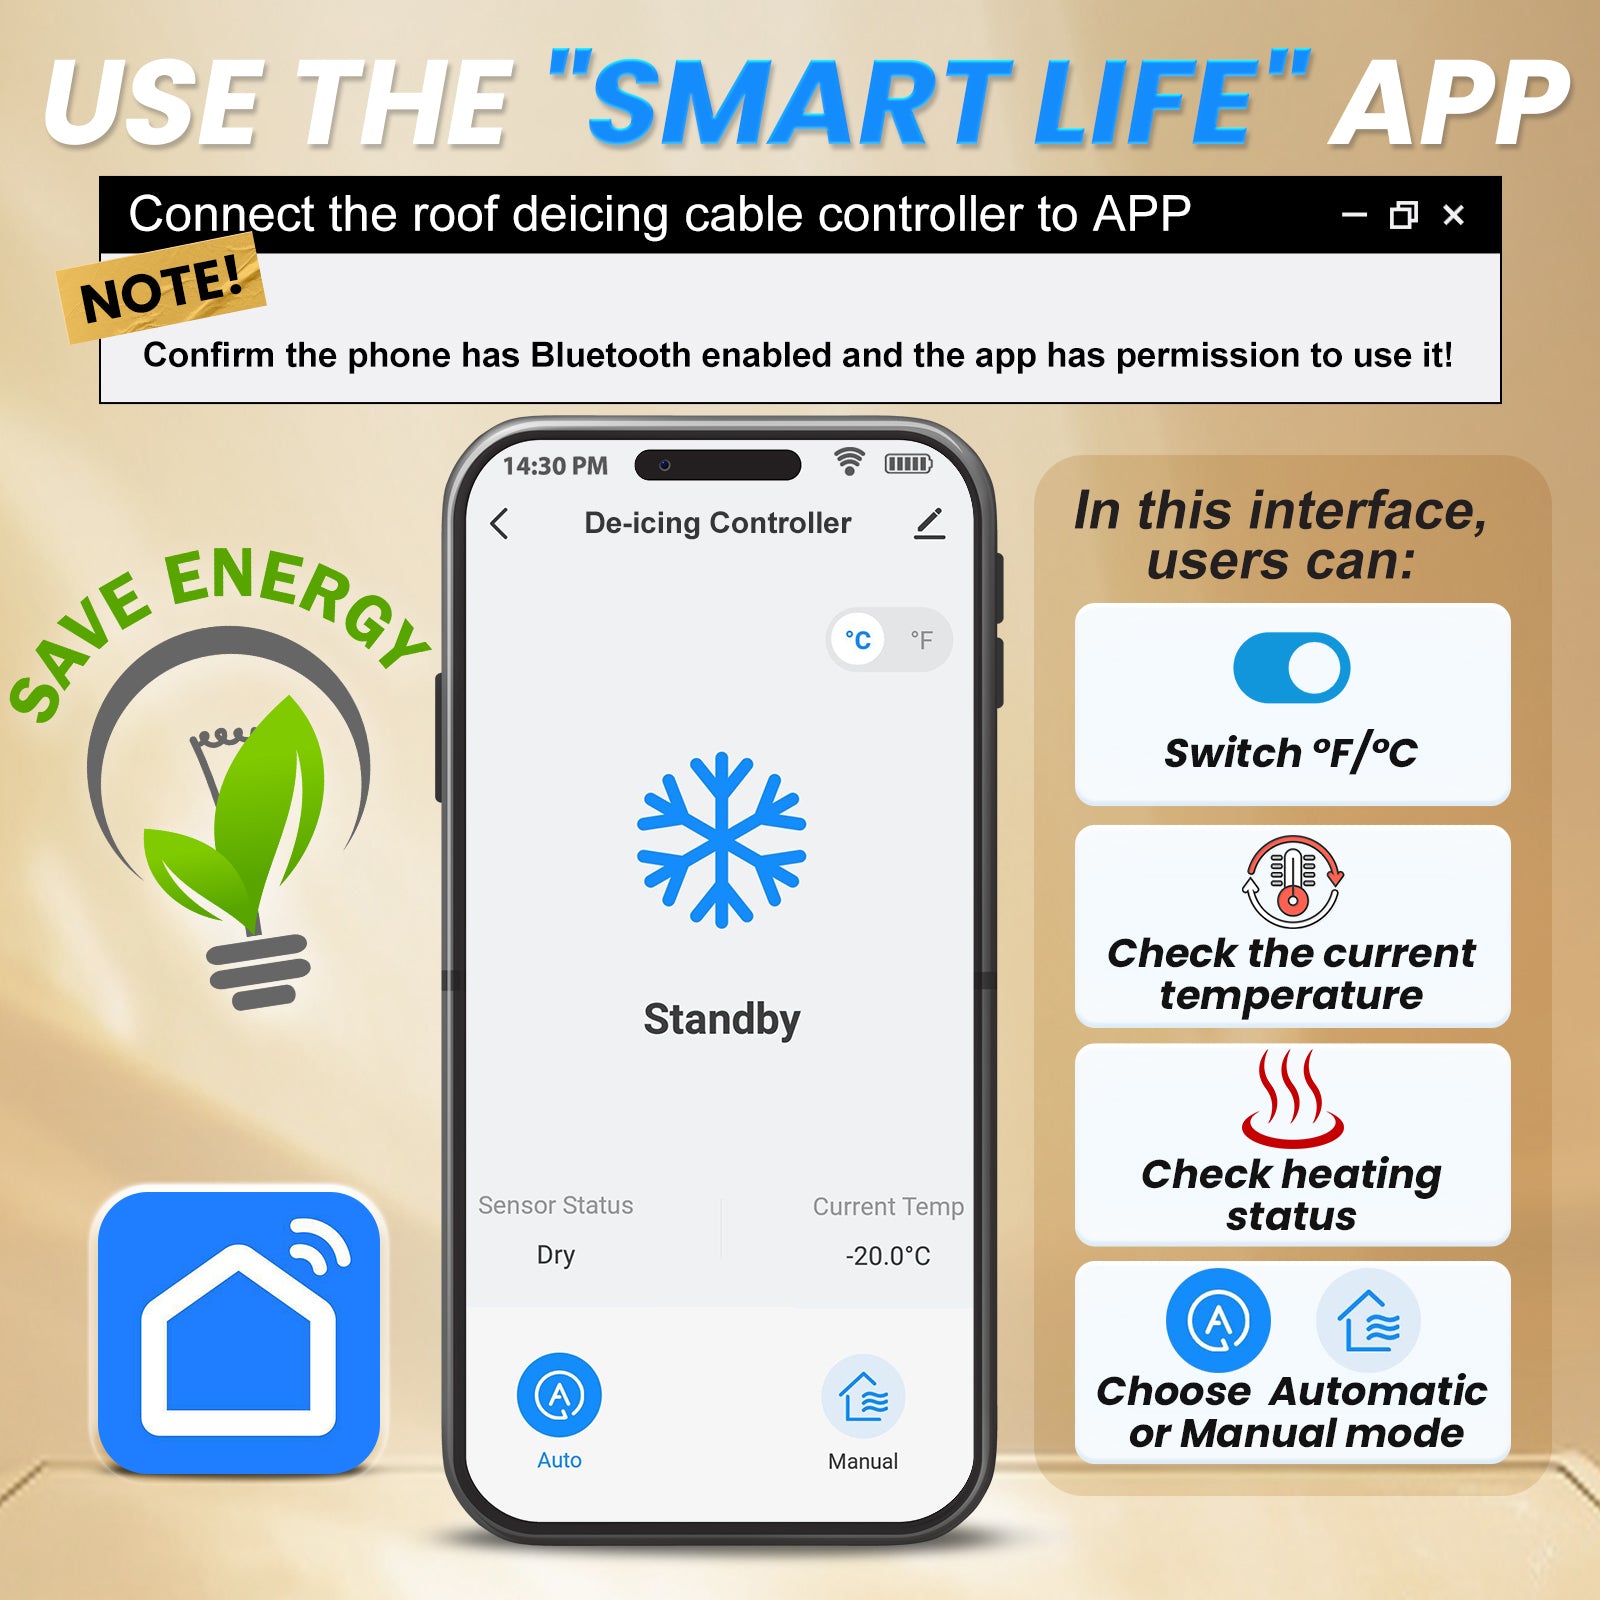
App Control
App control allows remote operation through the Smart Life app.
This is useful when:
• You are away from home
• You want to check or adjust the system remotely
• You want to switch modes without physically accessing the controller
• You want extra convenience during winter storms
Load and Cable Length Planning
Before connecting roof heating cables, calculate total load.
Do not exceed 15A / 1800W.
If your roof heating cable system exceeds the controller rating, use a different control method or divide the heating system into properly rated circuits according to electrical code.
Moisture Sensor Function
The moisture sensor detects liquid water.
It is not simply a snow sensor.
If snow is dry, frozen, or not melting at the sensor location, the app may show the sensor as dry and the controller may not activate in auto mode.
This is normal behavior and helps prevent unnecessary heating when there is no meltwater refreeze risk.
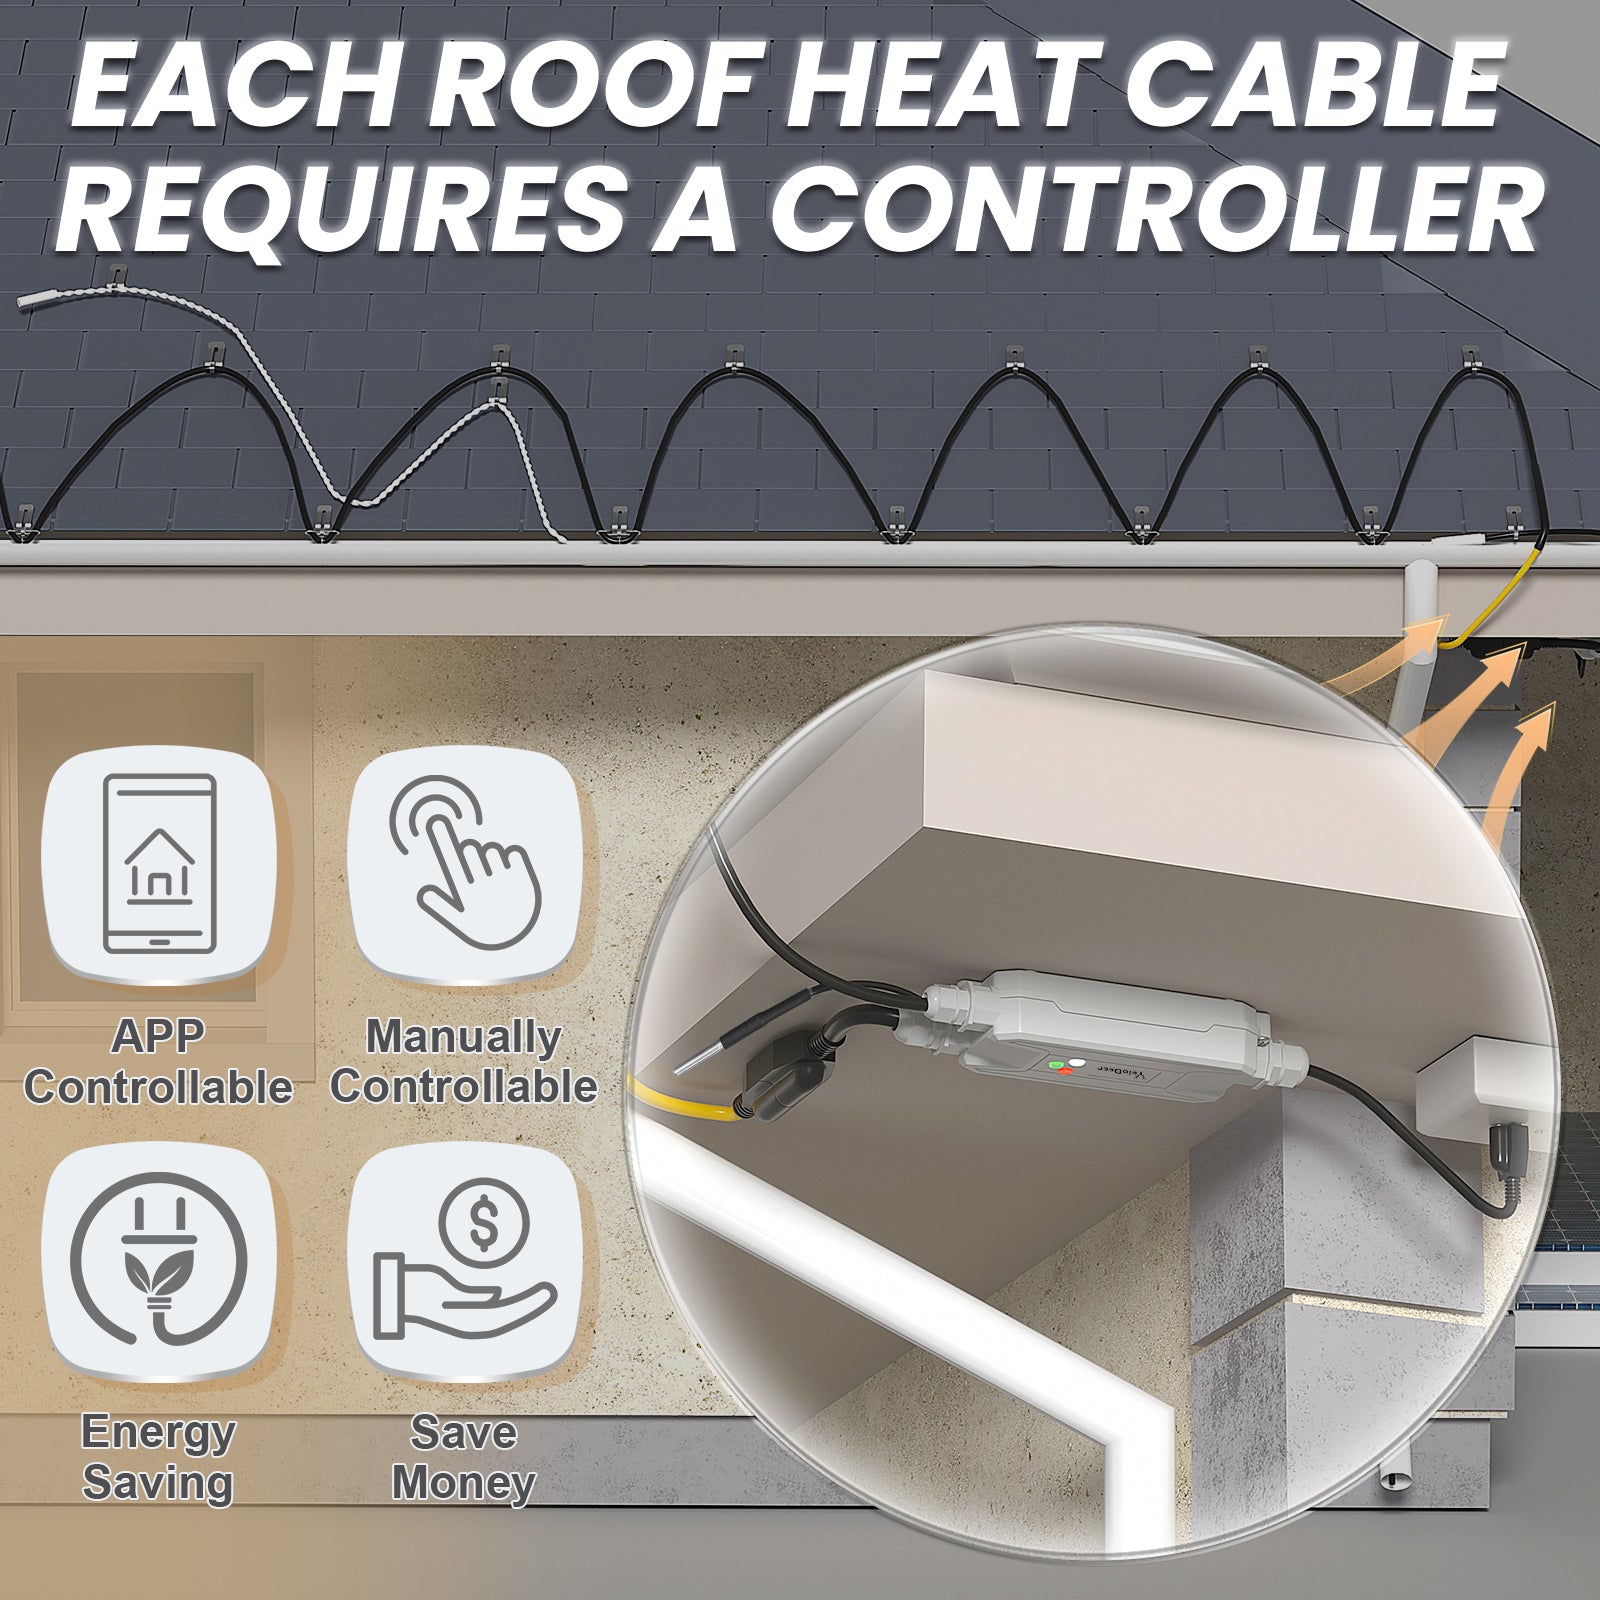
Installation & Accessories
Basic Installation Overview
YeloDeer Smart Roof De-icing Controller should be installed where it can power the roof heating cable and where the moisture sensor can be placed in the meltwater path.
Typical installation steps:
- Confirm your roof heating cable is 120V.
- Confirm total load is within 15A / 1800W.
- Plan the controller mounting location.
- Place the moisture-sensing cable where meltwater will contact it.
- Secure the sensor using the included clips and spacers where suitable.
- Connect the roof de-icing cable to the controller.
- Plug the controller into a properly protected outdoor-rated outlet.
- Select auto mode, manual mode, or app control.
- Test the system before severe winter weather.
- Check sensor status during early winter operation to confirm placement.
Important Installation Notes
• Use only with compatible 120V roof de-icing cables.
• Do not exceed 15A / 1800W.
• Place the moisture sensor where meltwater can reach it.
• Auto mode may not activate if the sensor is dry.
• The controller is weather-resistant, but plug and outlet protection are still important.
• Use outdoor-rated GFCI protection where required.
• Do not place electrical connections in standing water.
• Install before major ice dams form.
• Do not expect the system to remove heavy snow quickly.
• Follow roof safety and electrical code requirements.
• Hire a qualified installer for steep, high, or complex roofs.
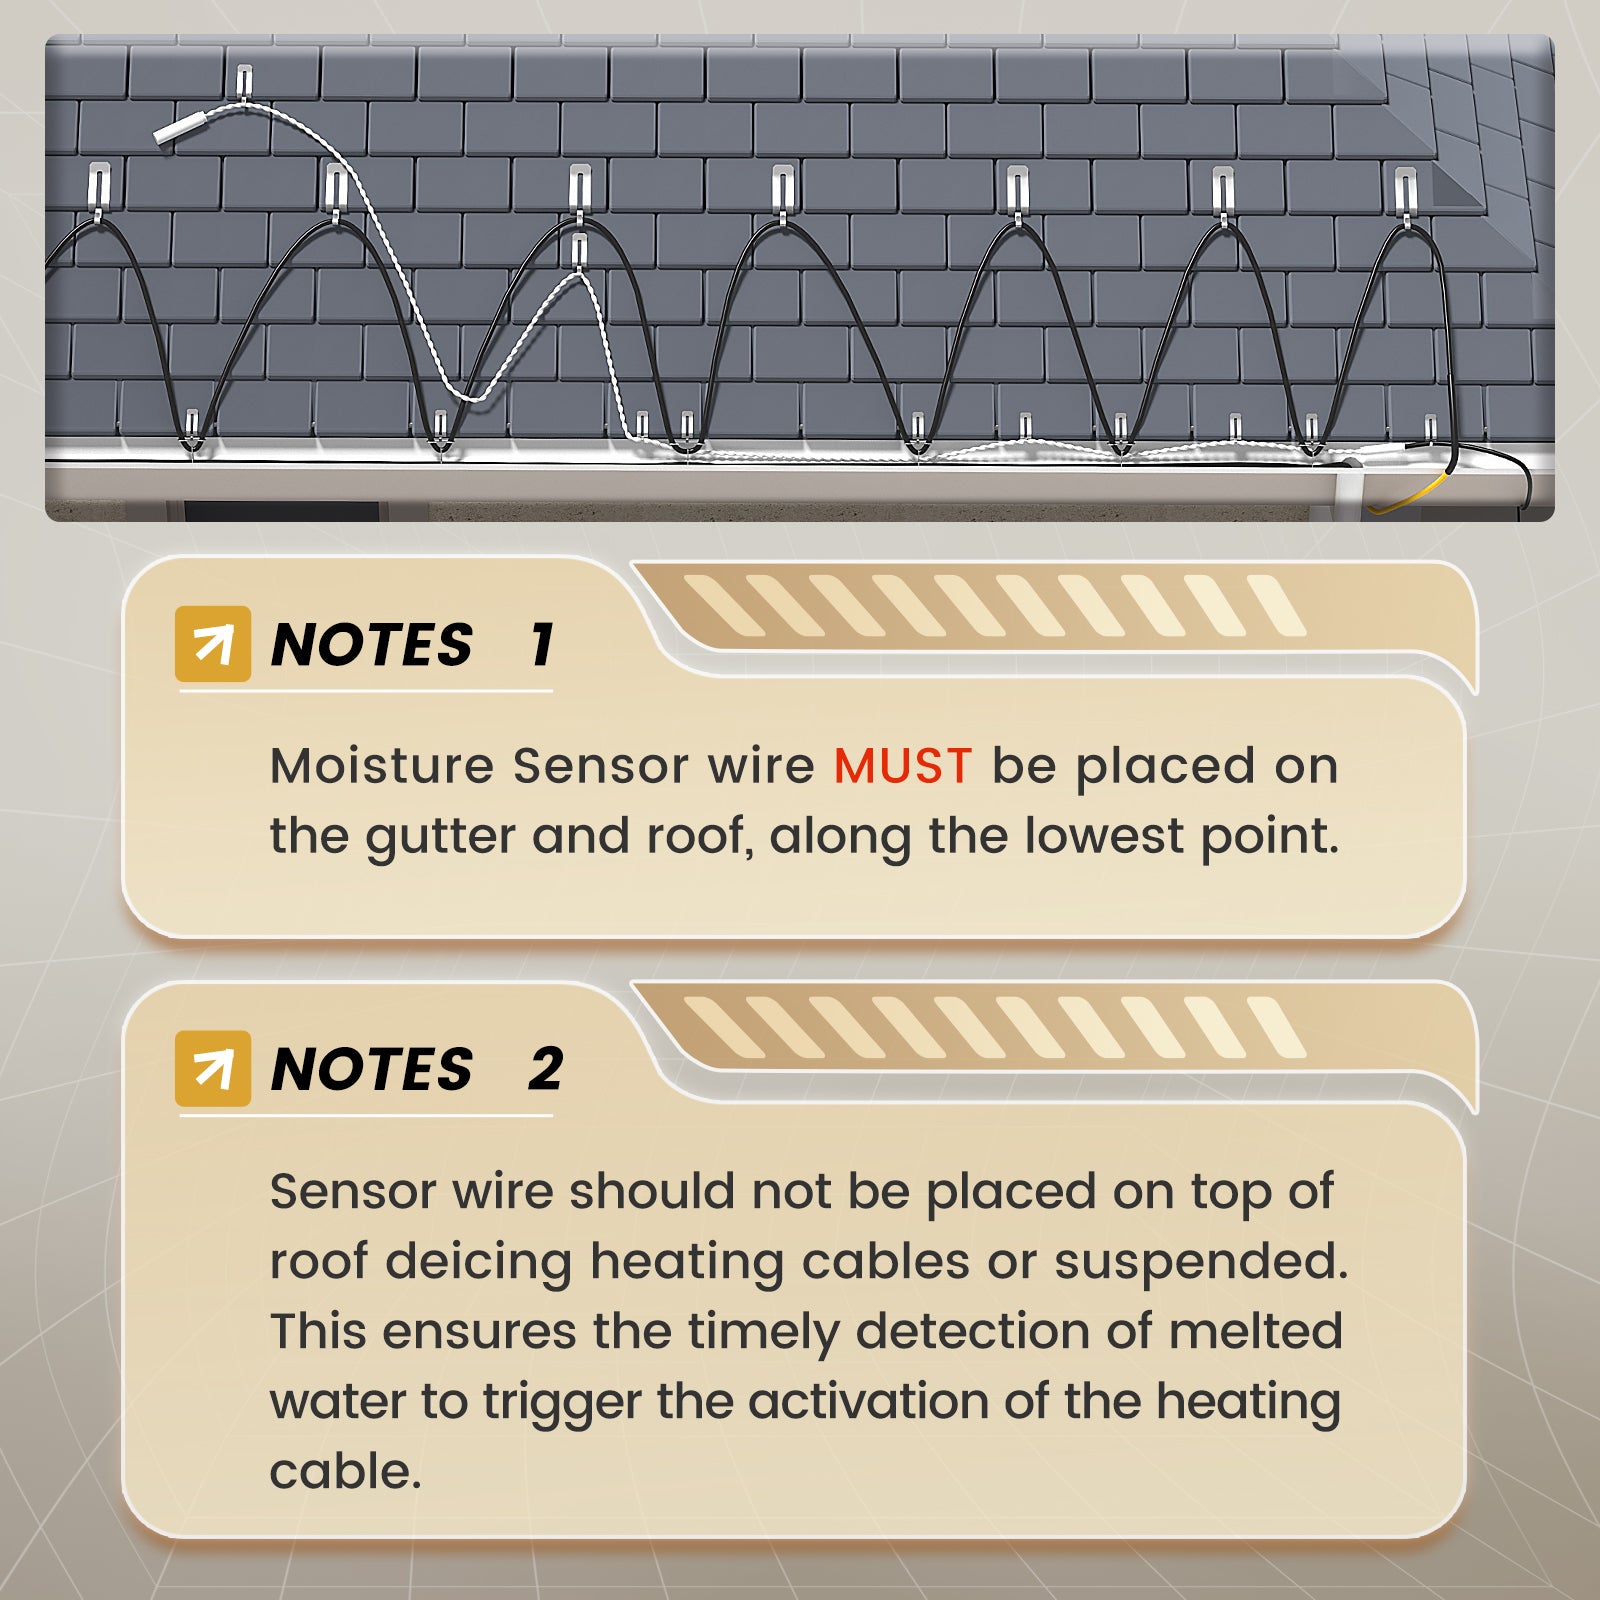
Moisture Sensor Placement Guide
The moisture sensor should be installed in a location where melting snow or ice water naturally flows.
Good sensor locations may include:
• Near roof edge meltwater paths
• Near gutter areas where water begins to drain
• Near heating cable loops where meltwater is expected
• Problem areas where refreezing often begins
Avoid placing the sensor where:
• It stays dry even when snow is melting
• It is buried in dry snow but not contacted by water
• It is far from the heated drainage path
• It is blocked from meltwater flow
• It is placed where debris can prevent water contact
Testing the System
Manual mode can be used to confirm that the controller and heating cable can power on.
If manual mode works but auto mode does not activate, the controller may not be defective. The most common reason is that the moisture sensor is not detecting liquid water.
Check whether the app shows the sensor as dry or wet, then adjust sensor placement if needed.
Using the Smart Life App
The Smart Life app can be used for remote operation and system checking.
App control is useful when:
• You travel during winter
• You want to activate manual mode remotely
• You want to monitor controller status
• You want more convenient control than physically accessing the controller
FAQ & Resources
Practical Questions About This Roof De-icing Controller
1. Why does auto mode not turn on when there is snow on the roof?
Auto mode requires both cold temperature and moisture detection.
The sensor must detect liquid water, not just snow or ice.
If the app shows the sensor as dry, the controller may not turn on in auto mode even if there is snow on the roof. This usually means the moisture sensor is not contacting meltwater yet, or the snow has not melted enough at the sensor location.
2. Is my controller defective if manual mode works but auto mode does not?
Usually no. If manual mode turns on the heating cable, the controller output is working. When auto mode does not activate, the most common reason is that the moisture sensor is reading dry or is not placed in the meltwater path.
Check sensor status and adjust the sensor position if needed.
3. Where should I place the moisture sensor?
Place the moisture-sensing cable where melted snow or ice water will naturally contact it.
It should be near the heated drainage path, such as roof edge loops, gutter flow areas, or problem spots where meltwater refreezes.
If the sensor stays dry, auto mode will not activate.
4. Can this controller remove an existing ice dam?
It is designed mainly to help prevent ice dams and maintain drainage paths when used with roof heating cables.
It is not intended to quickly remove large existing ice dams or heavy snow accumulation.
For best results, install and operate the system before severe ice buildup forms.
5. How much roof heating cable can it control?
The maximum load is 15A / 1800W at 120V. Check the wattage of your roof heating cable and make sure the total connected load does not exceed the controller rating.
If your system is larger, it may need separate circuits or a different control method.
6. Can I control it when I am away from home?
Yes. The Smart Life app allows remote control and mode adjustment when the controller is connected to WiFi. This is useful if winter weather changes while you are away.
7. Does it save energy?
Yes, compared with leaving roof heating cables powered continuously. Auto mode runs the system only when temperature and moisture conditions indicate a need for heating, helping reduce unnecessary runtime. Actual savings depend on cable length, wattage, weather, sensor placement, and how often winter conditions trigger operation.
8. What should I send if I need help troubleshooting auto mode?
Please email yelodeer@yelodeer.com with:
• Photos of roof cable layout
• Photos of moisture sensor placement
• App screenshot showing wet/dry sensor status
• Outdoor temperature
• Whether manual mode works
• Roof type and gutter layout
• Where ice normally forms
Our team can help review whether sensor placement or setup needs adjustment.
Related Resources
For compatible roof heating cables, view YeloDeer roof and gutter de-icing cables.
For pipe heat cable control, choose YeloDeer Pipe Heat Tape Thermostat.
For roof de-icing installation help, view YeloDeer roof de-icing guides.
For product selection or troubleshooting, contact yelodeer@yelodeer.com with photos and setup details.

